Asteroid Belt — Dodging the Rocks
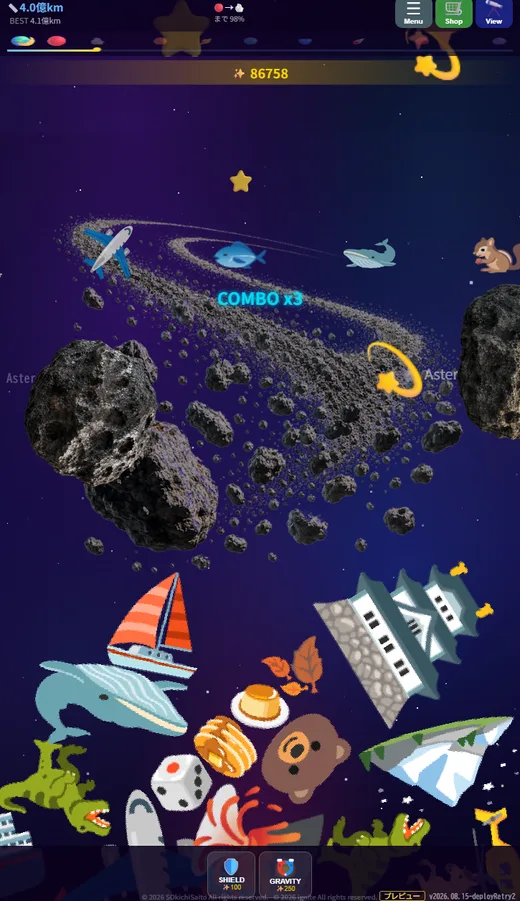
400 million kilometres out. If Mars was a fight against force, the Asteroid Belt is a fight against objects. Rocks come in from both sides and hit your tower directly.
What happens here
- Rocks arrive from either side at random (50/50 each time)
- A 1.5-second warning appears before each one
- First rock: 2.5 seconds after entry; then one every 3.5 seconds
- Rock diameter: 72–128 px (random); speed varies ×0.8–1.2 each time
If Mars was an occasional big wave, this is constant chop. Rather than trying to dodge everything, aim for a shape that survives being hit.
Width beats height
Rocks arrive at random heights spanning 15–65% of the screen, not a fixed band — the whole mid-section of your tower is in play. What matters is keeping a shape that can take a hit anywhere without collapsing.
The instinct is to rush through by building thin and tall. That is the worst option — a narrow tower has no resistance to sideways impact and loses its entire upper half in one hit.
- While in the danger band, avoid creating a narrow spike at the top
- Lay long items flat instead of standing them up
- Rebuild in the gaps between rocks
Rocks are a timing puzzle, not a wall
There is a short delay between the warning and the rock crossing. Drop an item in that window and it can be struck mid-fall.
The reliable rhythm is drop immediately after a rock passes. Rock passes → stack → wait for the next warning. Once you internalise it, your hands start moving on the sound alone.
Shield bounces rocks — but the rocks don't disappear
Unlike Mars, Shield is effective in the Asteroid Belt because rocks are physical objects. When a rock hits your shield, it bounces back — but it keeps travelling and can swing around to hit your tower a second time from the other direction.
Because of this, the smartest use is point-and-click, not permanent. Keeping your shield active all the time means every rebound costs you stardust. Activate it just as a rock approaches, let it bounce, then release.
Shield protects the item you drop, not the whole tower. Use it on a piece you absolutely cannot afford to lose. Save some stardust — Jupiter needs Shields too.
Common mistakes
Building thin to reduce the target area
Understandable, but backwards. Reducing surface area does not help if a single hit topples you. A low centre of gravity survives; a small profile does not.
Spamming drops without watching the warnings
Because the interval is short, players tend to mash. But an item struck in mid-air is lost and knocks into the tower on the way down. Drop one, watch it land, then drop the next.
Chasing knocked-off items
Moving your drop position to the screen edge to recover a lost item leaves the tower unattended. Let it go and protect the centre.
Stardust and combos
Catching itself is not hard here, so this is a good stretch for building combos. Keep aiming near the middle of your tower, where rocks interfere least, and the chain will hold.
This is also the first place your stardust really pays off, since Shield finally becomes useful. Buy one or two, keep the rest. Note that bounced rocks can come back — use Shield in bursts, not constantly.
Some real science
In game the rocks are relentless. In reality, the asteroid belt is mostly empty space. There are countless small bodies between Mars and Jupiter, but neighbouring asteroids are typically hundreds of thousands or millions of kilometres apart. Spacecraft pass through without any meaningful risk of collision.
The dense boulder field you see in films is dramatic licence — and yes, this game takes the same liberty, because it is more fun to play.
As for why the region never formed a planet: the leading explanation is that Jupiter's gravity kept stirring the material, so the fragments collided too violently to gently merge. When Bibi says the stones there never got to become anything, that is the story she is referring to.
Summary
- Rocks every few seconds from both sides — build to absorb hits
- Never go thin and tall; keep your width
- Stack right after a rock passes
- Shield works here. Use it on items that matter
Rock spawn data — the exact numbers
The rock schedule in the Asteroid Belt is not truly random — it follows a fixed timer.
| Parameter | Value |
|---|---|
| First rock appears | 2.5 seconds after entering the zone |
| Spawn interval | One rock every 3.5 seconds |
| Approach side | Random left or right (50/50 each time) |
| Altitude | Random between 15% and 65% of screen height |
| Rock diameter | 72–128 px (random each spawn) |
| Speed | 0.8–1.2× base (roughly 72–108 px/s) |
| Warning before impact | 1.5 seconds |
The rocks do not cluster in the upper half of the screen — they spread across a wide vertical range. A tower shape that protects its whole midsection is more valuable than one that just guards the top.
Getting hit unfreezes items — the cascade risk
When a rock strikes one of your bonded (frozen) items, that item loses its bond instantly. This sounds bad, but the real danger is what happens next: the unbonded item becomes unstable, wobbles, and can knock into neighbouring items, unfreezing them too. The chain collapse is usually far more damaging than the initial hit.
When you see a rock connect, resist the urge to drop a new item immediately. Wait for the dust to settle, then rebuild from the widest stable base you still have.
Quick answers (FAQ)
Q. Is keeping Shield active the safest option?
A. No. Shield bounces rocks but does not destroy them. A bounced rock can arc back and strike your tower again. Activating Shield right as a rock arrives — then releasing it — wastes less stardust and avoids the rebound problem. Reserve full-time use for items you genuinely cannot afford to lose.
Q. Can I predict where a rock will appear?
A. You can predict when — one every 3.5 seconds, with a 1.5-second warning. Side (left/right) and height (15–65% of screen) are both random each time, so positional prediction is not reliable. Focus on the timer rather than guessing the trajectory.
Q. Should I build a narrow tower to reduce the target area?
A. This is a common instinct but it backfires. Rocks span 15–65% of screen height, so a narrower profile does not reduce hits much. What it does do is make your tower fragile — one hit from the side and the top snaps off. Wide and stable survives; narrow and tall does not.